Friday, August 7, 2015

The-Oil-Alternative

Advertisement

http://tips-trick-idea-forbeginnerspainters.blogspot.com/2015/08/the-oil-alternative.htmlMy approach for creating oil portraits shares several similarities with my watercolor work; for example, I use a similar palette for both-yellow ochre, cerulean blue and alizarin crimson (substituted for rose madder), to which I may add cadmium red and ivory black; However, there are four important differences: In oil, I deal more with shapes than lines,I Work dark's to light, my color applications are opaque rather than transparent and I don't use the progression of three key techniques that I use for Watercolor.

I work on toned canvas-usually raw umber thinned with turpentine which provides a solid neutral tone and I start each portrait by doing a drawing with ivory black. 

As with my Watercolors, I start adding Color in the face, which I block with four values. I start by mixing my shadow color, then take a portion of this mixture and lighten it with white to create my halftone. Next I lighten a portion of the halftone mixture to produce my lights. Finally, I adjust a portion of in light mixture to produce my highlights. My brushes are all bristle filberts and I usually start the head using a different No. 6 for each tone. This keep the color clean and allows me to work the tones together.

Saturday, August 1, 2015

Master-Realism-1

Advertisement
Master-Realism-1

http://tips-trick-idea-forbeginnerspainters.blogspot.com/2015/08/master-realism-1.htmlWhether you work in watercolor or oil, here bow to give your portraits rich, lifelike fleshtones.
By Paul W. McCormack

I’ve always taken my artistic inspirations from the expressions of the human form-the ever changing countenance of a friend’s face in conversation, the blank stare of a stranger on a subway, or the poetic gesture of a stance. Although I work in both watercolor and oil (see “The Oil Alternative”),
I began my career nearly 35 years ago by painting the figure in watercolor, a medium that lends itself beautifully to recreating the translucent quality of flesh. By working transparently and using three basic techniques-wet-into wet, glazing and drybrush-I’ve developed a method that gives my portraits a look unlike conventional watercolors. This approach can be very time-consuming: I often spend 80 hours or more painting a simple head and shoulders. But the effort is worth it. The results of this process can prove” quite sublime. Here’s how it works.


Thursday, July 9, 2015

Outside-The-Box-Learn-From-The Master

Advertisement
Outside-The-Box-Learn-From-The Master
http://tips-trick-idea-forbeginnerspainters.blogspot.com/2015/07/outside-the-box-learn-from-themaster.html  I’m a dedicated wildlife artist, painting mostly North American birds and mammals, because I’m fascinated with these creatures. Great subjects can be found almost anywhere, and they’re just waiting to be painted a sparrow sitting on a window ledge, a turtle sunning on a log or a quail running in the brush. But despite the recurrence of my subjects, I make my paintings stand out from the others in my genre (and I never get bored with them) because I allow myself to go beyond the usual painting formats and explore new areas of the picture.
  Giving my wildlife paintings an odd size brings an added vitality to the subjects, and it makes them not only more exciting to paint but more interesting to view as well. It challenges me as an artist to be more creative in relating the background to the center of interest. After all, a painting size of 61/2 x 291/2 would challenge almost anyone’s creativity! I’ll show you how I go through the process of searching for the right format, and then how I paint within these new parameters, and with this I hope you’ll begin to expand your painting horizons, too. 

A Different View
From the window of my studio I often see nuthatches (small, tree-climbing birds) moving from limb to limb and clinging to tree trunks-even hanging upside down. The acrobatic subject of A Different View (watercolor 32x11) was perfect for painting in a tall format, and I emphasized this with the strong vertical shapes of the tree trunk and branch. I used the negative space of the background and the delicate texture of the lichen to further accentuate these shapes.

Exploring the Possibilities 
  Before placing any paint on the paper, I like to take the time to explore some of the different formats that can be used with each subject. Does the center of interest lend itself to a tall vertical painting, a long horizontal one or a traditional square one? For wildlife, the clues to answering this question are usually in the creature’s habitat. A bird may be perched at the end of a long and complex branch, or atop a curiously twisting tree trunk. 
  A mountain lion may be resting beside a variety of bushes or a stream full of beautiful reflections. Often there are natural lines in the environment that I can use to guide the viewer’s eye toward the painting’s center of interest. Unless the right format comes to me immediately, I’ll make pencil sketches that try out a variety of shapes before I settle on the one I’m going to stick with.

Tuesday, June 30, 2015

Pastels-And-Fixative-Debating

Advertisement
Pastels-And-Fixative-Debating

By Carmi Weingrod
http://tips-trick-idea-forbeginnerspainters.blogspot.com/2015/06/pastels-and-fixative-debating.htmlPastelists have been debating about fixatives since the eighteenth century. Now, after more than two hundred years of dialogue, the questions are still unresolved. Ask any group of pastelists about the topic and you’re likely to hear a volley of responses.
Some use fixative sparingly in the painting process to obtain certain color effects, some use it as a protective finish on completed paintings and others never use it at all. At least there’s agreement on one thing Pastel is a structurally fragile medium susceptible to mechanical injury and that makes paintings created with it difficult to store, frame and transport. Although a final coat of fixative appears to keep some pastel particles intact, it also obliterates the unique color and textural qualities that distinguish pastel from other painting mediums.
Unfortunately, the fixative dialogue delivers no clear cut answers, leaving the ultimate decision up to each pastel artist. Although I can’t you when to use fixative or how much to use or whether to use it at all, I can provide information to help you make the most educated decision possible about using fixatives in your own work, either in the painting process or as a protective coating for the completed work.

Tuesday, June 16, 2015

Watercolor Techniques - Dominance - Colors

Advertisement
Watercolor Techniques - Dominance - Colors

Dominance
Pay extra attention to this most often over looked color peculiarity. Color dominance needs to be considered when more than one color is mixed into a wash. The same color combination may result in an almost infinite variety of colors depending on the proportions of the mix. Whichever pigment is the most dominant in the mix will impose its characteristics on the wash, not only in the hue but in all other aspects of its nature as well, such as staining or nonstaining, opaque or transparent.

If the dominant color is Manganese Blue (a sedimentary pigment) and the secondary color is Burnt Sienna (a transparent color), the mixed color will not only be a bluer hue but will also be a grainy-textured color and will lift off better than Burnt Sienna would lift by itself. This is because Manganese Blue is the dominant color and not only its hue but also its other natural characteristics impose their dominance over the other color.

Thursday, June 11, 2015

Watercolor Techniques - Staining - Colors

Advertisement

Dark Staining
When a pigment tints the fiber of the paper it is called a staining color.These colors behave like a dye. The staining nature in a pigment is not relevant to other qualities. Opaque, sedimentary or transparent colors can be either staining or nonstaining. The degree of staining quality of a pigment is important to know only if you intend to lift out a color. 
A staining color will show a tint of its hue even after you have tried to wet-scrub and blot off the paint. This behavior remains even if the staining color is mixed with other nonstaining colors.

Dark Staining Colors include:
. All phthalo colors
. Burnt Sienna
. Scarlet Lake
. Sap Green
. Hooker's Green

Sunday, June 7, 2015

Watercolor Techniques - Sedimentary - Colors

Advertisement

Sedimentary Colors
Sedimentary, or granulating, colors are made from physically heavy pigments, Because of their weight, sedimentary colors sink into the water like pebbles. On rough or cold-pressed paper, they are first to land in the low, Hollow spots of the paper. On the smooth surface of hot-pressed paper, they settle quickly, but water rivulets create little river-like separations. 
All this behavior translates graphically into texture. A sandpaper like grain is the nature of these pigments. When you mix them in a wet wash with other colors, they will look grainy and may separate, While transparent colors will dissolve in water like tea and stay active as long as the wash is wet. When sedimentary and non-sedimentary colors are mixed, each color is individually visible, for example, Manganese blue, Burnt Sienna, Raw Sienna and Phthalo Blue.

Sedimentary colors include :
. Ultramarine Blue
. Raw Sienna
. Raw Umber
. Sepia
. Cobalt Violet
. Viridian Green
. Manganese Blue

Wednesday, May 27, 2015

Watercolor Techniques - Reflective - Colors

Advertisement

Reflective colors 
Reflective colors behave the opposite way of the true transparent pigments. The most transparent colors act like stained glass. They let the light penetrate through the wash and reflect from the paper through the color. Reflective colors let a certain amount of light get through to the surface of the white paper, but they are also capable of reflecting light from the surface of the paint.
If painted over a waterproof black line, reflective colors look very transparent while wet, but show a little of their own hue after they dry.
Opaque, semi opaque and reflective colors don't glaze well because they build up to a thick layer. All opaque colors that are light in hue are reflective, but not all reflective colors are opaque. A few reflective colors are considered transparent, yet they reflect light when they are applied in heavy consistency.

Reflective Colors include :
. cobalt Violet
. Cobalt Blue
. Raw Sienna
. Raw Umber
. Viridian Green
. Aureolin Yellow
. Magenta
. Cobalt Green

Monday, May 25, 2015

Watercolor Techniques - Opaque - Colors

Advertisement

Opaque Colors
Though all Watercolors called transparent are luminous in thin Washes, some have more body than others. These opaque or body colors are capable of covering other dry Washes When they are applied in a thick consistency, even if the dry underwash is dark and the top color is light.
They are not truly opaque, as acrylics are, but are more so than the transparent colors.

Opaque colors include :
- All Cadmium Lemon
- Venetian Red
- Yellow Ochre
- Winsor Emerald 
- Cerulean Blue 
- Naples Yellow
- Olive Green
- Permanent Magenta

http://tips-trick-idea-forbeginnerspainters.blogspot.com/2015/06/watercolortechniques-opaque-colors.html


Tuesday, April 7, 2015

Watercolor Techniques - Transparent - Colors

Advertisement

Transparent Color
These wonderful, glowing, luminous colors that all water colorists love behave similarly to stained glass. They let light penetrate through the wash and reflect from the paper through the color. These are the most suitable colors for glazing (applying a wet wash over a completely dry wash without disturbing the lower layer) because they don't build up when they overlap. These true transparent colors make the most glowing, clear dark's, but some of these pigments are very strong and tend to dominate when they are mixed with other colors.
If you want to use only true transparent colors, you could use liquid watercolors. Unfortunately, most of the watercolors in liquid form are not very permanent, so you need to research their light fastness.
However, even if you find a permanent liquid watercolor brand, you'd still rob yourself of the opportunity to use the excitingly varied nature of your pigments. Artists advice is to use an artist's quality transparent watercolor in the tube made by a reputable company.

Sunday, March 22, 2015

Paint Brush - Technical - Q&A

Advertisement
Paint Brush - Technical - Q&A
Q. Can I use my acrylic and watercolor brushes for painting with water soluble oils?
http://tips-trick-idea-forbeginnerspainters.blogspot.com/2015/03/paintbrush-technical-q.htmlA. You may use your brushes any way you choose if you get the results you want. But your brushes will generally work better and last longer if you use them with the medium for which they were designed.
Over the years, brushes have been fine tuned by manufacturers in response to artists' requirements, and each one is made for a specific purpose. Their fibers-natural hair, synthetics or a mixture of the two-have qualities that respond to their use in very particular ways. As a result, their versatility has some limitations The two areas that most notably affect these limitations are the viscosity of the paint and the solvent you're using with the paint.
If you use paints thickly, as impasto, bristle brushes will be the most useful because they're the stiffest. So if you're using your water-soluble oils thickly, not recommend using your soft-hair water color brushes. Your acrylic brushes, however are acceptable in this case if they're synthetic or relatively stiff bristled. If you plan to use your water soluble oils more thinly, as in glazing, use soft-hair or synthetic brushes designed for oil painting.


Friday, March 20, 2015

Paint Brush - Know How To Select Brush - Part 2

Advertisement
What you need to know about Watercolor Brushes
If you're a watercolor painter, you have two basic categories of brush to 
consider when selecting the right tool to suit your painting needs. First, you'll need a brush that will deliver enough water and pigment to cover broad areas or washes. The flat, the wash and the mop are all good examples of this type of brush. 
Secondly, you'll need another type of brush for drawing, details and special effects. The round is the most versatile brush in this category, but there are several other specialized brushes you can also check out. To get the best results for your own painting style, you'll want to experiment with several styles of brush in each category.
When shopping for brushes, be sure to evaluate their quality, Many brushes look good in the counter display, but appearances can be deceiving. A truly good watercolor brush doesn't just look good, it must also have snap, retain its shape when wet and have proper loading qualities. Most brushes come from the manufacturer with a coat of glycerine (sizing) on the hair. They look perfect with a fine point and a fat belly, but you won't know the true character of the brush until you've softened the glycerine coating. Especially when you're buying a round brush, ask for a glass of water to swish the brush in. Then try snapping it-literally snapping your wrist to reform the bristles. If the bristles don't return to a point or if there's more than one point, select another brush. This brush will probably never give you the results you want.

http://tips-trick-idea-forbeginnerspainters.blogspot.com/2015/03/paintbrush-know-howtoselect-brush.htmlLooking at Hair
In the world of watercolor brushes, kolinsky sable is considered the best you can get. In general, kolinsky provides excellent flow, spring and snap as well as a fabulous point. Unfortunately, a kolinsky sable can also be quite expensive, running as much as several hundred dollars for a large brush.
There are, however several other good options to choose from. Sable or red sable brushes are moderately priced and still quite responsive. 


Thursday, March 19, 2015

Paint Brush - Know How To Select Brush - Part 1

Advertisement
Paint Brush
Know-How to select the brushes 
that gives you the painting results you're after, whether you work in oils, acrylic or watercolor. No other piece of an artist's equipment is more important than a quality, responsive brush. You may have a beautifully prepared canvas, perfect working light, brilliant pigments and a sturdy easel. But if your brush doesn't perform, chances are that your painting won't be as good as it could be. After all, the brush is the tool that most directly transfers your ideas, your touch and your passion onto the canvas or paper.
If your brushes aren't performing up to expectations, you'll probably waste a lot of time and effort, and lose the thread of what you're doing in the process. Fighting your brushes to get the effect you want isn't worth the battle, and with the quality and quantity of choices available now, it's not necessary, either.
Instead, use your time to figure out what type, size and shape of brush will help you get exactly the results you want no matter what look you're going for. All it takes is a little experimentation. Whether you work in oil, acrylic or watercolor here you'll find all the steps you need to take to find the brush or brushes that are perfect for you.
http://tips-trick-idea-forbeginnerspainters.blogspot.com/2015/03/paintbrush-know-how-to-select-brush.htmlWhat you need to know about Oil & Acrylic Brushes
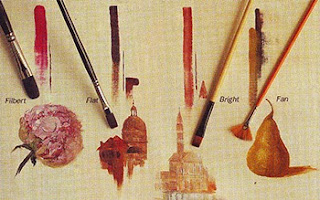
When you enter an art supply store, there are two key decisions you'll have to make to select the brush you need. First, you have to determine what style or shape of brush you're after. Brush shapes can vary from flat and round to fan and filbert and more. Next you must decide what fiber (natural or synthetic) you prefer.

Wednesday, March 11, 2015

Drawing Tutorials - The proper way to stripe a Tiger

Advertisement
Drawing Tutorials - The proper way to stripe a Tiger
http://tips-trick-idea-forbeginnerspainters.blogspot.com/2015/03/drawingtutorials-proper-way-to-stripe.htmlAs simple as one might think placing tiger's stripes would be, some particular observations may be of help. The number, shape and thickness of the stripes vary on individual animals. On most tigers the general direction taken by the stripes on the sides conforms with the slant of the ribs beneath (see figs. 1, 3, 4 & 5). Yet a loose skinned, heavily-furred type may have lanky flanks and belly sag which tend to stretch out these curves,(see fig. 2)this does incline toward a 'flat' look, especially from a straight side view.

Fig.1 has a thick "boomerang" stripe angling under the stomach. On the spine are split stripes tapering off between `the side markings. No animal ever has continuous stripes going around the body. They are always broken somewhere; a few may be mere dashes. The thick side stripes of fig. 3 are like a bow (of a bow and arrow). Both 1 & 2 have the lower shoulders more or less devoid of stripes. If there is a plain area, that's where it will be, and many big tigers have it. Some huge tigers have little more than pin stripes (fig. 5). Fig. 4 widest stripes are a little like twisted teardrops.

Tuesday, March 3, 2015

Color Pencil Drawing - Basic Coloring Technique

Advertisement
http://tips-trick-idea-forbeginnerspainters.blogspot.com/2015/03/color-pencil-drawing-basic-coloring.htmlColor Pencil drawing - basic coloring technique
The Value Scale
Perhaps the single most important principle in learning to make pictures is understanding the value scale. It is simply a series of tones ranging from the very darkest to the very lightest. It is very helpful to number these values, ten being black, one being white and two through nine being the shades of grey in between. You don't necessarily have to draw it out. Just keep it in your mind. After first making your line drawing, you use it to determine the relationship between the dark and the light areas of your picture. Then, while looking at the scene you wish to draw, decide what area is the darkest and make that area the darkest value of your drawing. Next, decide which is the lightest, and leave that part of your drawing white. Then logically decide where the rest of the values go by looking at your subject and thinking about what you see. It is much simpler than it sounds. Remember, the human eye sees more in terms of dark and light than it does in terms of color.


Sunday, January 18, 2015

Painting Techniques

Advertisement
Oil Painting Techniques
Oil paint is a very versatile medium. Anyone who paints in oils would do well to explore as many different techniques as possible. Some of them are bound to come in handy at times.
Don't worry about developing a technique of your own. It will come in time. lust keep studying and trying different techniques and palettes until you find a combination you're really comfortable with.
Eventually a style of your own will emerge and people will begin to recognize your work.

IMPROPER USE OF OIL PAINTS...Here the paint has been applied too thinly and spread too far. This method is useful only for uderpainting.

                                                         
http://tips-trick-idea-forbeginnerspainters.blogspot.com/2015/01/painting-techniques.html
                                                                Improper use of oil paint - Get full of the medium

Saturday, January 17, 2015

Oil Painting Tips - Renaissance Painting Techniques

Advertisement
Tips Of The Day
http://tips-trick-idea-forbeginnerspainters.blogspot.com/2015/01/oil-painting-tips-renaissance-painting.html Q: Can you recommend a practical way to replicate the gold grounds often seen in medieval and Renaissance paintings?

A: Although there are several excellent gold acrylic paints on the market today, the brilliant effects of gold leaf grounds found in many medieval and Renaissance paintings can't be easily duplicated by the simple application of a painted ground.

On the other hand, gilding, the ancient art of adhering thin metal leaf to a surface, can emulate the appearance of these ancient paintings. Two gold leaf gilding methods are used for this purpose: water gilding and oil gilding, also called mordant gilding, which is the simpler process of the two.

There are three essential tools required to master this delicate art: a gilder's cushion, a thin 6"-x-10" padded palette on which the leaf can be laid out flat; a gilder's knife for handling, straightening, and cutting the leaf; and a gilder's tip, a rather flat brush with sparse hairs, for picking up the leaf and laying it on the surface.

Tuesday, January 13, 2015

Oil Pastel Art - For Painting Tips

Advertisement
What Are Pastel?

http://tips-trick-idea-forbeginnerspainters.blogspot.com/2015/01/oil-pastel-art-for-painting-tips.htmlPastels are powdered colours mixed with water and chalk or oil and chalk, and made into sticks. Some manufacturers put in a binder to stop the pastels crumbling; the softer the pastel, the less binding is used. Water-based pastels are more often used than oil pastels.

What Materials Are Needed?
A Selection of Pastels Pastels are sold in boxes, with a compartment for each pastel, and to stop the sticks rattling about they are protected by a layer of cotton wool or tissue. There are at least 200 distinct tints, and boxes usually contain 12, 24, 36, 72 or 144 pastels, plus specialized selections for landscape and portrait work. Pastels are also sold singly and where expensive ingredients are used, prices of some individual sticks are higher than others.
There are hard pastels and soft pastels; the soft pastels are usually cylindrical .icon section, the hard ones square or encased in wood (the extremely useful pastel pencils which can double as coloured pencils). Hard pastels, the most famous of which is Conte crayon, are chalk based. Because of their hardness they are mostly used for preliminary work and detail, and are often used at an early stage in the picture as it is sometimes difficult to apply hard on top of soft pastel if used loosely, though not if rubbed in with the finger tip. Soft pastel, far more frequently used, goes well on hard pastel.

Thursday, January 8, 2015

What Are Acrylic Painting - For Painting Tips

Advertisement
What Are Acrylic For Art Painting

http://tips-trick-idea-forbeginnerspainters.blogspot.com/2015/01/what-are-acrylic-painting-for-painting.htmlAcrylics are the only new paint to have come onto the market for centuries. Introduced in about 1962, they are as versatile as it is possible to imagine. They can be used thickly like oil paints, or in transparent washes like watercolours. They can be applied to almost any surface whether it be paper, panel, cardboard or canvas. Their main attribute is that they dry yes quickly and are ideal for those who work at top speed and like to see a finished picture in half an hour. They dry too quickly for some, but the drying speed can be slowed down with a retarder, and there are all Kinds of additives such as mediums and texture pastes to suit every taste, though normally water is used as the painting agent. 
Van Gogh would have loved acrylics. Some established painters are suspicious of them despite the many claims (justified) made for them.
Acrylic can being very quick drying. there is a temptation to regard a quick flashy picture as a good picture; it is almost impossible to avoid making a picture by putting on colour at speed. acrylic can be mixed with other mediums to create something wholly new, and acrylic is virtually permanent. Unlike oil paints, where asterisks on the tube denote the degree of permanence, you can be pretty sure that acrylics last.

Monday, January 5, 2015

Painting Tips On Establishing Accurate Values

Advertisement
http://tips-trick-idea-forbeginnerspainters.blogspot.com/2015/01/painting-tips-on-establishing-accurate.htmlSix Do's and Don'ts For establishing Accurate Values


1. When painting, never judge a value independently but always in relationship to at least two other values. for study purposes only, however, it's perfectly legitimate to isolate a value and seek to determine its individual place on the tonal scale.

2. Always aim for a strong, simple tonal effect rather than for a complex, fragmented one, wich usually serves only to weaken a painting.

3. Be selective, simplify, don't attemp to render all the tones you see, since this is beyond human capacity.

4. Pay special attention to your halftones, they are subtle, delicate creature, and given render loving care and attention they will respons by lending beauty, character and sensitivity to your painting.

5. In painting highligths, pain just what you see, resist the temptation to render them lighter than they are just because they are hightlights.

6. Keep a tight rein on your reflected lights lest they distort the shadow by their overaggressive, deadly attraction. nothing can kill a shadow faster than a gorgeously over stated reflected light.

While value is, for artistic purposes, separated into nine degrees of tonality, it is also-for the same reason-divided into six different kinds. They are:

Saturday, January 3, 2015

How To Draw Tiger Head In Eight Easy Steps

Advertisement
DRAWING TIGER HEAD -IN EIGHT EASY STEPS
http://tips-trick-idea-forbeginnerspainters.blogspot.com/2015/01/how-to-draw-tiger-head-in-eight-easy.html
1.Lightly sketch a circle. Divide it as shown.
2. Then mark off each half of the horizontal line in thirds.  Do the same with the bottom half of the vertical. Add another  1/3 mark under circle.
3. Spot in the eyes and nostrils.           
4. Draw in eye corners.  Drop parallel lines to nose for muzzle's top.  Position ears halfway in two top arcs (either facing forward,  as on left,  or facing outward, as on right).  Draw chin.

http://tips-trick-idea-forbeginnerspainters.blogspot.com/2015/01/how-to-draw-tiger-head-in-eight-easy.html
5. Sketch in bulbous muzzle in line with outside of eyes.Extend each half slightly below circle.                                                  
6. Add shaggy ruff  behind cheeks.  Indicate streaks from which whiskers will come. These streaks are darker in tiger  than lion.         
7. With very light lines decide on pattern for facial stripes.  Spotin pupils.  Add whiskers.
8. Darken  stripes and shade muzzle.