Thursday, November 13, 2014

6 Easy Step To Draw a Horse in Painting Tips

Advertisement

http://tips-trick-idea-forbeginnerspainters.blogspot.com/2014/11/6-easy-step-to-draw-horse-in-painting.html


1. Lightly sketch a rectangle 
with "run-over" lines.


http://tips-trick-idea-forbeginnerspainters.blogspot.com/2014/11/6-easy-step-to-draw-horse-in-painting.html


2. About midway in the front find the shoulder point (a). Topping the two verticals will be the withers (b) and the apex of the hips (c).
http://tips-trick-idea-forbeginnerspainters.blogspot.com/2014/11/6-easy-step-to-draw-horse-in-painting.html

3. Add the breast line (a), the belly line (b) and the buttocks line (c).
http://tips-trick-idea-forbeginnerspainters.blogspot.com/2014/11/6-easy-step-to-draw-horse-in-painting.html

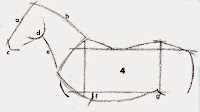
4. Sketch the neck and head (a-e). In many horses the neck is not too much longer than the head (see upper right diagram).
Establish me elbow (f) and stifle or patella (g).

http://tips-trick-idea-forbeginnerspainters.blogspot.com/2014/11/6-easy-step-to-draw-horse-in-painting.html


5. sketch two sweep lines (front A and back A).
The back one should angle out more than the one in front and should be more curved. Add two fetlock knobs (a). 
http://tips-trick-idea-forbeginnerspainters.blogspot.com/2014/11/6-easy-step-to-draw-horse-in-painting.html


6. Add a few finishing touches, keeping the final concept simple. Try several drawings until they look right.                                                                


http://tips-trick-idea-forbeginnerspainters.blogspot.com/2014/11/6-easy-step-to-draw-horse-in-painting.html
Now, start developing the legs A through D. Notice the hoof (c) is, in each case, in front of the sweep line (step C). 
In D-front fish knee (d), and in D-back find the hock (d). Also, connect the fetlock with the hoof by two short parallel lines (e).
This approach to drawing a horse's foot will save infinite trouble later on. 
Study the enlargement E and F.

Thursday, November 6, 2014

Taking Horse Head Points One by One 1 - Painting Tips.

Advertisement
http://tips-trick-idea-forbeginnerspainters.blogspot.com/2014/10/taking-horse-head-points-one-by-one-1.html
As a rule the first line to be set down in drawing a horse' s head is that running off the forehead (1).   Nearly always this line is slanted at 45' provided the horse is standing normally.   Having drawn line 1,  draw line 2.
The heavier the horse  (draft variety), the more parallel and farther apart lines 1 and 2 will be.   Line  3 may be less than 1/2 of line 4 in a light riding horse or more than 1/2  of line 4 in a heavy draft horse. (sketch lightly)
http://tips-trick-idea-forbeginnerspainters.blogspot.com/2014/10/taking-horse-head-points-one-by-one-1.html


Next, sketch a little triangle in front of the above line  3.   Line  6 of that triangle  extends to join line 7 to make the chin.   Notice that,  as underdrawing,  short line 7 may be parallel with line  5.   About midway along the remainder of  the  original line 2, draw arc 8.   This is to be the bottom of the prominent cheek bone of the lower jaw.   This curve drops below straight line 2 about as far as does the little chin
triangle.

Wednesday, November 5, 2014

Taking Horse Head Points One by One 2 - Painting Tips.

Advertisement
Fig. 9,  second only to the  jaw bone in prominence is the facial crest ridge or  zygomatic bone.  This is highly conspicuous ,(consult fig. 10).  It is a continuation of,  but steps down a little from,  the. scallop mentioned in fig. 8.  

Get so you watch for this ridge whenever you're around a horse or see a picture of a horse.


Fig. 10, this is the skull fitted into the head' s outline. No animal has more obvious bone embossvent in his head than the horse.


Fig. 11, here is the 'change of planet stairway where shadow is likely to occur. A little time spent pondering this will never be regretted. (Also notice the mobility of the ear. )

Tuesday, November 4, 2014

Leonardo Davinci Note Books 2

Advertisement
Figure 2.
Based on Leonardo's note books, for putting in the Features..
In his note ­books, Leonardo explains that the major types of features are those
that lie flat along a baseline, those that rise.and those that fall from the baseline.


http://tips-trick-idea-forbeginnerspainters.blogspot.com/2014/10/leonardo-davinci-note-books-2.htmlhttp://tips-trick-idea-forbeginnerspainters.blogspot.com/2014/10/leonardo-davinci-note-books-2.html


http://tips-trick-idea-forbeginnerspainters.blogspot.com/2014/10/leonardo-davinci-note-books-2.html

http://tips-trick-idea-forbeginnerspainters.blogspot.com/2014/10/leonardo-davinci-note-books-2.html


Good Horse Drawing 1 Painting Tips

Advertisement
http://tips-trick-idea-forbeginnerspainters.blogspot.com/2014/10/good-horse-drawing-1-painting-tips.htmlThere is no "magic" formula for drawing a good horse,  but there are many factors which will help us in the process.  


1 - The  body of  every horse will not fit into a square such as ABCD of fig. 1.  

Most are a little longer; very few are higher.  
The average saddle horse does not  hold his head quite this high; many high-spirited and show horses hold their  heads this high - some higher.  
Follow the numbering from  1 to 28.  Notice where the various points come in relation to the dotted lines.


Monday, November 3, 2014

Leonardo Davinci Note Books 1

Advertisement
Figure 1.
" Getting a Likeness." To place the features on the face, divide it into three equal parts -from the hairline to the eyebrows, from the eyebrows to the base of the nose, and from the base of the nose to the chin.

http://tips-trick-idea-forbeginnerspainters.blogspot.com/2014/10/leonardo-davinci-note-books-1_20.html

http://tips-trick-idea-forbeginnerspainters.blogspot.com/2014/10/leonardo-davinci-note-books-1_20.html

http://tips-trick-idea-forbeginnerspainters.blogspot.com/2014/10/leonardo-davinci-note-books-1_20.html

Good Horse Drawing 2 Painting Tips

Advertisement
One of  the  big problems in drawing or painting horses is their surface anatomy.  As a link between the simple facts on the opposite page and subsequent discussions on inner structure, 

the following aids are itemized with illustrations :
http://tips-trick-idea-forbeginnerspainters.blogspot.com/2014/10/good-horse-drawing-2-painting-tips.html


1- Light-colored horses exposed to overhead

lighting may have a very subtle tint to shade graduation. 
Watch for light at arrows.


2 - In this drawing are 10 key places where a change in tone may occur. This does not mean there are no other places,  but to know these helps.


3 to 5 are suggested gradations for: light (3), middle-toned (4) and dark-colored (5) horses.  To be sure,  the source of light, muscle-trim, reflective quality of the hair, etc.  have much to do with the appearance.  


Sunday, November 2, 2014

More Interior Drawing Painting Tips - watercolor painting

Advertisement

More Interior Drawing

Here, again, the tool was a pen. In this series, use the contour method except that added much more interior drawing. This is a step toward developing the shadow area shapes and
gives the indication of some values we will use to paint. Although there is a little interweaving of the shapes,
You don't woven the heads into the background. This would be a necessity if you are going to make a painting with a more serious design concept.

http://tips-trick-idea-forbeginnerspainters.blogspot.com/2014/10/more-interior-drawing-painting-tips.html

Saturday, November 1, 2014

Improving Your Drawing Skill Painting Tips - watercolor painting

Advertisement

Improving Your Drawing Skill

Whether drawing from your photographs or a live model, there are two methods that can improve your drawing skills and help you loosen up.
The first method is using a brush to draw rather than a pencil or pen.
This is a marvelous way to develop dexterity with your brush. 

The second method is contour drawing. Again, the more you practice these skills, the better you become. also develop your skills by meeting with other artists in your area sometimes to draw and paint from a live model. Work in different mediums-from pencil to watercolor, Oil or Acrylic. 
http://tips-trick-idea-forbeginnerspainters.blogspot.com/2014/10/improving-your-drawing-skill-painting.htmlPerhaps you can find a similar group in your area. You don't need an instructor. Simply chip in enough money to cover the model fee.