Friday, March 20, 2015

Paint Brush - Know How To Select Brush - Part 2

Advertisement
What you need to know about Watercolor Brushes
If you're a watercolor painter, you have two basic categories of brush to 
consider when selecting the right tool to suit your painting needs. First, you'll need a brush that will deliver enough water and pigment to cover broad areas or washes. The flat, the wash and the mop are all good examples of this type of brush. 
Secondly, you'll need another type of brush for drawing, details and special effects. The round is the most versatile brush in this category, but there are several other specialized brushes you can also check out. To get the best results for your own painting style, you'll want to experiment with several styles of brush in each category.
When shopping for brushes, be sure to evaluate their quality, Many brushes look good in the counter display, but appearances can be deceiving. A truly good watercolor brush doesn't just look good, it must also have snap, retain its shape when wet and have proper loading qualities. Most brushes come from the manufacturer with a coat of glycerine (sizing) on the hair. They look perfect with a fine point and a fat belly, but you won't know the true character of the brush until you've softened the glycerine coating. Especially when you're buying a round brush, ask for a glass of water to swish the brush in. Then try snapping it-literally snapping your wrist to reform the bristles. If the bristles don't return to a point or if there's more than one point, select another brush. This brush will probably never give you the results you want.
http://tips-trick-idea-forbeginnerspainters.blogspot.com/2015/03/paintbrush-know-howtoselect-brush.htmlLooking at Hair
In the world of watercolor brushes, kolinsky sable is considered the best you can get. In general, kolinsky provides excellent flow, spring and snap as well as a fabulous point. Unfortunately, a kolinsky sable can also be quite expensive, running as much as several hundred dollars for a large brush.
There are, however several other good options to choose from. Sable or red sable brushes are moderately priced and still quite responsive. 


Thursday, March 19, 2015

Paint Brush - Know How To Select Brush - Part 1

Advertisement
Paint Brush
Know-How to select the brushes 
that gives you the painting results you're after, whether you work in oils, acrylic or watercolor. No other piece of an artist's equipment is more important than a quality, responsive brush. You may have a beautifully prepared canvas, perfect working light, brilliant pigments and a sturdy easel. But if your brush doesn't perform, chances are that your painting won't be as good as it could be. After all, the brush is the tool that most directly transfers your ideas, your touch and your passion onto the canvas or paper.
If your brushes aren't performing up to expectations, you'll probably waste a lot of time and effort, and lose the thread of what you're doing in the process. Fighting your brushes to get the effect you want isn't worth the battle, and with the quality and quantity of choices available now, it's not necessary, either.
Instead, use your time to figure out what type, size and shape of brush will help you get exactly the results you want no matter what look you're going for. All it takes is a little experimentation. Whether you work in oil, acrylic or watercolor here you'll find all the steps you need to take to find the brush or brushes that are perfect for you.
http://tips-trick-idea-forbeginnerspainters.blogspot.com/2015/03/paintbrush-know-how-to-select-brush.htmlWhat you need to know about Oil & Acrylic Brushes
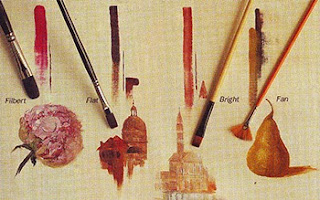
When you enter an art supply store, there are two key decisions you'll have to make to select the brush you need. First, you have to determine what style or shape of brush you're after. Brush shapes can vary from flat and round to fan and filbert and more. Next you must decide what fiber (natural or synthetic) you prefer.

Wednesday, March 11, 2015

Drawing Tutorials - The proper way to stripe a Tiger

Advertisement
Drawing Tutorials - The proper way to stripe a Tiger
http://tips-trick-idea-forbeginnerspainters.blogspot.com/2015/03/drawingtutorials-proper-way-to-stripe.htmlAs simple as one might think placing tiger's stripes would be, some particular observations may be of help. The number, shape and thickness of the stripes vary on individual animals. On most tigers the general direction taken by the stripes on the sides conforms with the slant of the ribs beneath (see figs. 1, 3, 4 & 5). Yet a loose skinned, heavily-furred type may have lanky flanks and belly sag which tend to stretch out these curves,(see fig. 2)this does incline toward a 'flat' look, especially from a straight side view.

Fig.1 has a thick "boomerang" stripe angling under the stomach. On the spine are split stripes tapering off between `the side markings. No animal ever has continuous stripes going around the body. They are always broken somewhere; a few may be mere dashes. The thick side stripes of fig. 3 are like a bow (of a bow and arrow). Both 1 & 2 have the lower shoulders more or less devoid of stripes. If there is a plain area, that's where it will be, and many big tigers have it. Some huge tigers have little more than pin stripes (fig. 5). Fig. 4 widest stripes are a little like twisted teardrops.

Tuesday, March 3, 2015

Color Pencil Drawing - Basic Coloring Technique

Advertisement
http://tips-trick-idea-forbeginnerspainters.blogspot.com/2015/03/color-pencil-drawing-basic-coloring.htmlColor Pencil drawing - basic coloring technique
The Value Scale
Perhaps the single most important principle in learning to make pictures is understanding the value scale. It is simply a series of tones ranging from the very darkest to the very lightest. It is very helpful to number these values, ten being black, one being white and two through nine being the shades of grey in between. You don't necessarily have to draw it out. Just keep it in your mind. After first making your line drawing, you use it to determine the relationship between the dark and the light areas of your picture. Then, while looking at the scene you wish to draw, decide what area is the darkest and make that area the darkest value of your drawing. Next, decide which is the lightest, and leave that part of your drawing white. Then logically decide where the rest of the values go by looking at your subject and thinking about what you see. It is much simpler than it sounds. Remember, the human eye sees more in terms of dark and light than it does in terms of color.


Sunday, January 18, 2015

Painting Techniques

Advertisement
Oil Painting Techniques
Oil paint is a very versatile medium. Anyone who paints in oils would do well to explore as many different techniques as possible. Some of them are bound to come in handy at times.
Don't worry about developing a technique of your own. It will come in time. lust keep studying and trying different techniques and palettes until you find a combination you're really comfortable with.
Eventually a style of your own will emerge and people will begin to recognize your work.

IMPROPER USE OF OIL PAINTS...Here the paint has been applied too thinly and spread too far. This method is useful only for uderpainting.

                                                         
http://tips-trick-idea-forbeginnerspainters.blogspot.com/2015/01/painting-techniques.html
                                                                Improper use of oil paint - Get full of the medium